Monday, September 3, 2012

Tomato Sammie Season

Okay, so this is a bit of a lame post, but I just wanted to announce that the tomatoes are ripening! Even the larger slicers are turning red. I finally had enough to make grilled caprese sammies, and they were delicious. 


I'm starting to get a little concerned, because at this rate, tomato season will be in full swing while I'm out of town. I have two trips planned, so Drew has been given specific (and hopefully simple instructions) on how to preserve the haul while I'm gone.

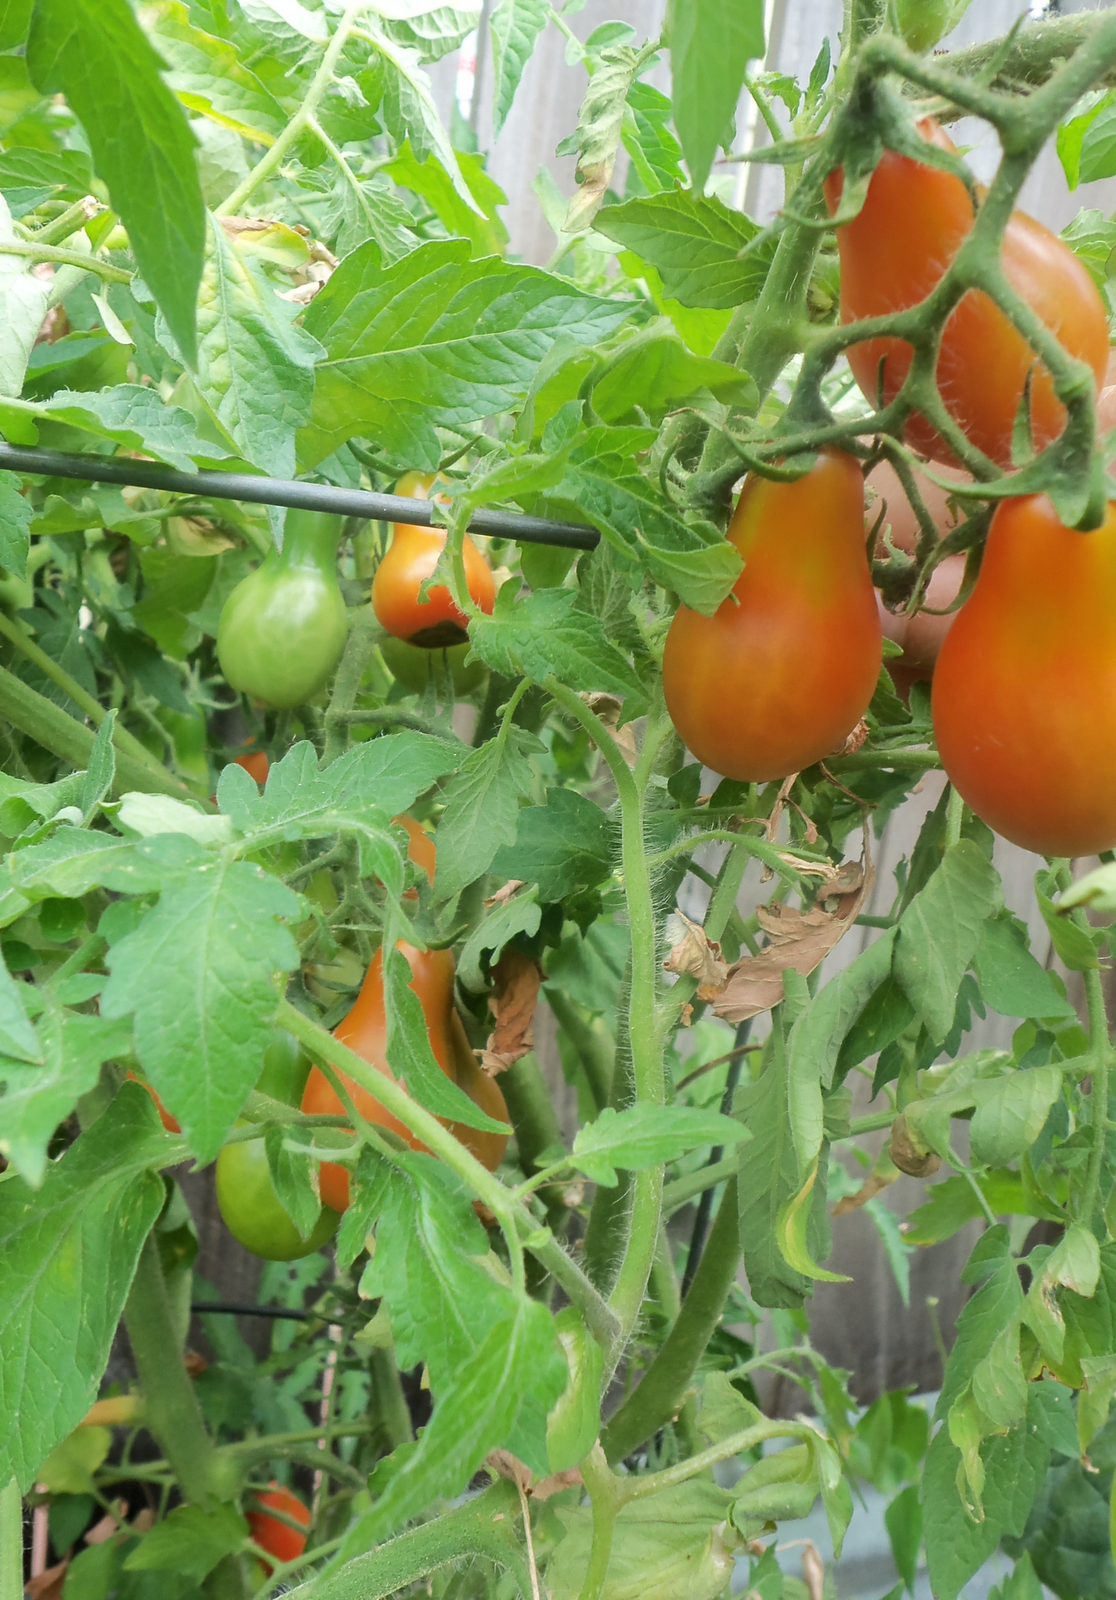
Also, the eggshells seemed to help with blossom end rot. Yay! The pear tomatoes are looking better for sure. Check it out!

Wednesday, August 29, 2012

Pear Crisp for 2

When we moved into your newest place, one of the things I was most excited about was the pear tree. We didn't get very many last year, but this year they're huge, and I think the grand total is eleven, which isn't too shabby for a little tree. 

Part of where I went wrong last year was that I didn't know you're supposed to harvest pears before they're ripe. I thought they were like apples, and kept waiting for them to soften on the tree. Eventually they just got funky and fell. Pears that ripen on trees become mealy and eventually their cores begin to break down, making them pretty unappetizing. These are Bartlett pears (I think) which are ready to pick when they're green, and ripen to a soft yellow. To see if they're ready, lift them up to a 30 degree angle. They should easily snap off into your hand. If you have to pull or twist them, check back later. 

I picked two pears last week which finished early, and this is the rest of the harvest. 


Notice the difference in color in the ripened pear. 
 Pear Crisp w/basil cream
  • 2 ripe pears, chopped
  • 1 small lemon
  • 1 tbsp honey
  • 1 tsp cinnamon
  • 2 tbsp butter
  • 1/4 cup flour
  • 1/4 cup oats
  • 2 tbsp cane sugar
  • ground nuts (optional)
  • basil whipped cream
Heat the oven to 375. Mix the chopped pears with honey, lemon, and cinnamon, and allow to sit while you prepare the crumble. I made mine by hand, 'cause I didn't feel like cleaning the food processor, but the easiest thing to do would be to mix the rest of the ingredients in a food processor until the butter is mixed in and crumbly. Place the pears in little tart pans, top with the crumble, and place in the oven for about 20-30 minutes. 

Basil Whipped Cream
8oz heavy cream
2 large basil leaves, chopped
powdered sugar

Simmer cream on stove with basil leaves for just a few minutes. Cool completely in fridge. (This takes several hours.) Strain basil and process as regular whipped cream with a little powdered sugar. 

The pear crisp will begin to smell really good when it's about ready. I snuggled with Sully on the couch while we waited. Allow to cool for a bit before eating, and top with basil whipped cream. We ate ours on pot holders while they were still warm.


Drew wasn't a huge fan of the fresh basil on the top, so we'll probably omit that next time, but the infused cream was a keeper for sure. 

Tuesday, August 28, 2012

Homemade Vegetable Broth & Summer Squash Soup

As someone who creates a ton of vegetable scraps with all my cooking and gardening, I've taken to making my own vegetable broth. I learned this technique while working in vegetarian restaurant in Nashville. It's so simple, easy, and delicious, you'll kick yourself for having not thought of it on your own. 

All you have to do is set aside space in your freezer for a gallon sized bag. Instead of tossing your onion and garlic skins, carrot peels, and woody kale stems in the compost or trash, place them in a freezer bag. The only things I wouldn't recommend are potato skins, but any other veggie scrap will do. Also, save your turning lettuce for the compost bin. This is just for healthy and "unusable" vegetable scraps. 

Once your bag is full, place the veggie scraps in a large pot, and cover with water. Bring to a boil, and then simmer for about 30 minutes. Feel free to simmer or steep longer depending on your taste preference. 

Strain and pour into a large jar or tupperware. This keeps in the fridge for 3-5 days. The broth can be frozen or canned as well.  Or you can go ahead and use some of it to make some soup like I did. 


Summer Squash Soup w/Garlic & Ginger
*This is another great recipe for using up some of the end of season summer squash. This soup is very creamy, but there's no cream in it!
  • 2 tbsp butter (olive oil okay instead, too)
  • 1 yellow onion, chopped
  • 8 small cloves of garlic, rough chopped
  • 4 medium summer squash, quartered (I used yellow and zucchini) appx 2 lbs.
  • 4 cups vegetable broth
  • 1 teaspoon fresh ginger (sub 1/2 tsp powdered)
  • salt & pepper
  • fresh chopped herbs (parsley and oregano)
Melt the butter over medium heat. Add the onion and garlic and cook on low heat until the onion is soft and translucent and doesn't brown about ten minutes. 
Add the squash, raise the heat to medium, and cook until soft. Add the broth and bring to a simmer. Simmer for about 45 minutes.
Let cool a bit, then blend with an immersion blender until smooth and creamy. You could transfer to a blender of food processer if you don't have an immersion blender. 
Taste and season with fresh ginger, salt, and pepper. Top with fresh herbs. I used parsley and oregano. This pureed soup is good and light on it's own, or makes a heartier meal with croutons or bread. 


Monday, August 27, 2012

Thai Eggplant Green Curry


These guys have really taken off since my first attempt at hand-pollinating eggplant. In addition to being quite prolific and tasty, I think the plants themselves are kinda pretty. I like the shape of the leaves and pale purple flowers. The eggplants grow to about 7 inches long, but you can eat them when they're little to encourage more growth. I picked this variety up as a start this year. I didn't read or save the tag, but based on some online research, I'm concerned that it's a hybrid. This means I can't save the seeds. I've read about a few thai long green eggplant heirloom varieties, but I'm not sure that's what I have. I suppose I could save the seeds, and see what happens, but if it's a hybrid, it won't produce the same plant.                                                       Here's a quick lesson on seed saving science: hybrid seed is created by crossing two highly inbred (cross pollinated) plants. When the two inbred parents are crossed with each other, the result is F1 (first generation) hybrid seed. You have to repeat this process every year to produce the same hybrid type. The plants from F2 (second generation) are often sterile and won't produce an exact copy of the plant. It may have many of the same characteristics, or you might discover something really neat, but you could also end up with a big headache and no veggies. If risky experimentation isn't your thing, I'd suggest trying Louisiana Eggplant. I haven't grown it myself to say for sure, but it looks a lot like the Thai hybrid variety. It's a southern heirloom that will definitely allow for saving seeds. Personally, I'll be trying this one out next year instead. 

But for now, I'm going to enjoy my delicious Thai green eggplant in one of my favorite Thai dishes. When Drew and I go out for Thai, our go-to order is to share a fat noodle dish and a curry, and green is my favorite. I'm certainly not skilled or trained in Thai cooking, so this is my humble attempt at recreating one of my restaurant faves at home. I used tofu, but you can make this with chicken or any other meat. I think traditionally, green curry is just meat, eggplant, basil, and lime leaves, but I like lots of veggies so I added peppers, mushrooms, and some of the never ending zucchini from the garden. FYI: I wouldn't recommend substituting regular italian eggplant, as Thai and Japanese varieties have a softer flesh, are less watery, and much better at absorbing flavors.

Thai Eggplant Green Curry
  • I container extra firm tofu, cubed
  • 2-3 tbsp of green curry paste
  • 2 full sized Thai green eggplant (purple Japanese eggplant is fine, too)
  • 1 small zucchini
  • 1 red bell pepper
  • thai chili or jalapeno depending on your heat preference
  • large handful of mushrooms
  • 1 can coconut milk
  • 1 tbsp fish sauce (sub soy sauce if you're veggie, but the fish sauce really makes a difference with the flavor)
  • 1 tsp brown sugar
  • large handful of thai and/or lime basil
  • kaffir lime leaves (if you've got 'em--unfortunately I didn't have any)
  • more thai or jalapeno peppers for garnish
  • 2 limes
So, I cooked this in shifts. I stir-fried the tofu in a little oil until it was brown on all sides, and then set it aside in a bowl. Then I cooked the the eggplant and the zucchini in the same pan/wok. Stir-fry these veggies until the skin softens and is a little brown and slightly seared (about 3 mins). Add to the bowl with the tofu. Now for the final round, stir-fry the peppers for about 3 minutes on their own and add the mushrooms for an additional 3 minutes. Add those guys to the bowl as well. (If you're using other veggies, just cook things together that have a simliar texture/cooking time.
In a larger pot or wok, heat 1 tbsp of oil over medium heat, and add the green curry paste. Thin the paste out in the oil and saute for like 30 seconds. It should be smelling pretty good right about now. Then add half the coconut milk and let simmer for a bit while you gather the other ingredients. Stir in the sugar, fish sauce, lime leaves, and remaining coconut milk. Bring to a boil, and add the bowl fully of tofu and mixed veggies. Squeeze in a lime.

Serve with jasmine rice and some lime wedges. Top with fresh thai/lime basil and fresh jalapenos.


Sunday, August 26, 2012

GHERKIN

The Mexican Sour Gherkins are here! And they've arrived in full force. My gherkin plant is covered in the teeny little cucumbers that look a lot like miniature watermelons. I tried this variety for the first time this year and purchased it as a start. I must say it's now on the list of things to plant every year. These guys struggled a bit when I first planted them. Apparently they need full sun, and lots of it. As soon as I moved them into a spot that gets 6-8 hours a day, they began to thrive. They don't need a lot of attention, and so far they haven't run into any pest or disease problems. 

I think they taste great fresh off the vine. You can pop them in your mouth cherry-tomato style, but they are so so so good pickled. I've read online that some folks have seem them in farmer's markets, but they're rare, so you may have to just grow them yourself next year. I plan to save some seeds, but you can pick up a packet here or here. Seed Savers also carries the West Indian Gherkin which I may try out next year.


Mexican Sour Gherkin Pickles

  • 8oz jar
  • large handful of gherkins 
  • 1 1/2 cups distilled white vinegar
  • 1 cup water
  • 2 tbsp salt (Kosher if you have it--to keep it from getting cloudy)
  • 1 tbsp sugar 
  • 1 chile pepper
  • 1 clove of garlic, sliced
  • several whole cloves
  • 1 tsp mustard seeds
  • 1 tsp whole black peppercorns
*You can substitute 2 tsps of pickling spice for the mustard and pepper, too.


Wash and remove the blossom end points from the gherkins. Place them in an 8 ounce jar. Mix the vinegar, water, salt, and sugar in a saucepan. Simmer until sugar dissolves. Add the garlic, chili, and spices. Remove from heat and allow the contents to steep with a lid on until the mixture is warm but no longer hot. Pour the brine over gherkins in jar, cover with lid, and allow to cool before storing in the refrigerator. If you want to formally can them, process the jars as you normally would while the contents are still warm.


Saturday, August 18, 2012

Pickled Beets

I've yet to meet a person who's on the fence about pickled beets. I think you either love em or hate em. I personally LOVE this recipe. The beet pickles are sweet and tender with a little mulled wine-like spice that reminds me of fall. Once again this is a small batch/refrigerator pickle recipe as I haven't really had a huge harvest of anything to justify formal canning.

Part of what made this batch so good was the HONEY. My family knows how much I love the honey from this little, off the beaten path, farm and petting zoo in Cottageville, South Carolina. 
I recently received a care package that included some goods from Bee City. Thank's y'all! I was especially excited about the honey dipper. I've always wanted one of those. Anyway, use high quality honey if you can--it really makes a difference. 

PICKLED BEETS
Makes 1 quart (two pint jars)
Approximately 4-5 beets
1 cup vinegar
1 cup water 
1 tbsp mulling spices (cloves, orange peel, cinnamon, allspice)
2 tsp pickling spice
1 clove of garlic, minced
1 bay leaf
1/2 cup honey
1/4 medium sweet yellow onion
2 sprigs of tarragon

Boil the beets in water for about 30 minutes until tender. Allow to cool and remove the skins. Slice or chop them depending on your preference. Bring the vinegar, water, garlic, bay leaf, pickling spice, and mulling spice to a boil. Add the honey. Remove from heat, and remove the bay leaf. Leave the other spices in the solution. Pack your jars with the onions, beets, and tarragon. Tarragon and beets are my new favorite flavor combination right now. You can't leave out the tarragon--this is a must! Pour the hot vinegar solution into the jars over the beets. Leave 1/2 inch from the top and seal. Allow to cool before placing in the refrigerator. Ready to eat the next day, but the flavor is better if you can wait two days. 

These beets are great added to salads, straight out of the jar, or served as a snack with some cheese and crackers.

Friday, August 17, 2012

Summer Veggie Pasta Salad with Japanese Eggplant


While this recipe isn't that innovative, and most folks already have a go-to-pasta salad, this one was so good and colorful I wanted to share it. If nothing else I wanted it documented to make it again myself.

Check out today's haul:
This recipe used many of the veggies I harvested this morning. Japanese eggplant is my new favorite vegetable. It's very thin skinned compared to western varieties, so there's no need to peel it. Also it's seedless and not very bitter like the kind you usually see in the grocery store. I've been harvesting them regularly after my pollination experiment. I've mostly been sautéing them with a little garlic and olive oil, but they're also especially good on the grill, or in stir fries with a little soy sauce and sesame oil.

SUMMER VEGGIE PASTA SALAD 
1 box rainbow penne pasta
1 zucchini, sliced and quartered
1 yellow squash, sliced and quartered
1  japanese eggplant sliced and quartered
Large handful of french green beans, trimmed
1 cloves of garlic
Large handful of lettuce/greens of your choice (I used spinach, baby chard, and mache)
10 cherry tomatoes, halved
1/4 cup chopped fresh basil
salt/pepper
Shredded italian cheese
Splash of olive juice

Boil pasta, drain, and set aside in a large bowl to cool a bit. In the mean time, chop all your veggies. Saute one clove of garlic and the eggplant first, as it needs a little more time to cook. After five minutes add the zucchini, yellow squash, and green beans. Go ahead and add the handful of lettuce, tomatoes, remaining garlic clove, and fresh basil to the bowl with the pasta. Once the veggies have softened, but still have a bite to them, add them straight into the bowl with everything else. This causes the lettuce to wilt slightly, which I like, especially using a sturdier green like spinach or baby swiss chard. If you don't like warm salads, wait for the veggies to cool before mixing with the lettuce. Top with cheese, salt & pepper, and a little extra olive oil. I tossed in a splash of olive juice at the end, but this isn't required. You could try adding lemon or a light vinegar to give it some acid as well.

Oops! I forgot to add the cherry tomatoes!