Friday, July 27, 2012

Zucchini Fritters & Beet Salad


Since this year's zucchini is rolling in, I thought it best to use up the frozen zucchini I saved from last year. Frozen zucchini is perfect for the obvious zucchini baked good, but it's also great for zucchini fritters.                                                                  To freeze zucchini, shred it and leave it in a strainer for several hours, squeezing as much excess water out as possible. Several cups of zucchini will fit in a gallon plastic freezer bag. Press it flat, and place in the freezer until frozen. Once it's frozen, you can stack the large squares, but refrain from stacking them until frozen. Otherwise the bags stick together.


ZUCCHINI & TOFU FRITTERS
This recipe is adapted from the Veganomicon

1 lb firm tofu 
2 medium zucchini, shredded
3 cloves garlic
3 TBSP lemon juice
1 TSP salt
1/2 cup bread crumbs, plus more for for coating
Chopped fresh oregano
Chopped fresh dill
Chopped fresh mint


I defrosted the last of the frozen zucchini, and placed it in a strainer again, squeezing out as much water as possible. This recipe is great for fresh zucchini, too. Just shred and strain as you normally would. Squeeze out the water from the tofu as well. Place in a food processor with lemon juice and garlic, and pulse a bit. It will look kinda like ricotta cheese.

Transfer to a bowl and mix in the bread crumbs and herbs. The mix should be fairly stiff. Fold in the shredded zucchini. 

Press into balls that are about an inch thick, coat with more breadcrumbs, and place on an oiled baking sheet. Bake at 350 for about 15 minutes, flip 'em, and bake for 15 minutes more.

BEET SALAD
2 beets, roughly grated
1 shallot, thinly sliced
Chopped parsley
Chopped tarragon
Dijon mustard
Oil & Vinegar
Salt & Pepper
Dressing: Mix vinegar and oil 2:1, add two spoonfuls of dijon mustard, salt and pepper to taste. 
If the beets are young, small, and have a thin skin, no need to peel them. Otherwise, peel the beets before grating by hand or in a food processor. Add sliced shallots, dress the beets, and top with chopped herbs. The tarragon is a MUST in this salad, It really enhances the flavor of the beets. I've also had this salad with shredded carrots mixed in, and it tastes great as well. 


The beet salad only takes about 5 minutes to prepare, so I also made my go-to early summer garden salad: greens, radishes, carrots, and green onions. I made a quick buttermilk dressing using some leftover buttermilk and greek yogurt.

BUTTERMILK DRESSING
2 garlic cloves, minced
1/2 cup buttermilk
4-5 tbsp greek yogurt
Mustard powder, salt, and pepper to taste
Chopped fresh thyme 
Chopped fresh parsley
Chopped fresh chives

I'm sure you could mix this up in a bowl, but I placed everything in a mason jar and shook it. :)


This was our first meal of the season exclusively using produce from our garden--which I must say, has yet to get old. 


Thursday, July 26, 2012

The Birds & the Bees: Hand-pollinating Eggplant

It was the third week in July, and still no eggplants. My eggplant had been producing beautiful purple flower for weeks, but nothing was happening. No fruits! The bees have been hanging out near the carrots which doesn't even make sense. 

After a little research, I'm attempting to alter 'mother-nature' myself. I'm tired of waiting, and ready to make all the amazing summer eggplant dishes on my list.


Eggplants (like tomatoes, peppers, and a few other veggies) are self-pollinating, meaning their flowers have both male and female parts. This means that they don't need bees to transfer the pollen from male flowers to female flowers--they can just do it themselves--but sometimes they need a little help. While eggplant flowers don't require bees to transfer pollen from another flower, the vibrations from the bee can help dislodge the pollen and move it to the stigma of the flower.

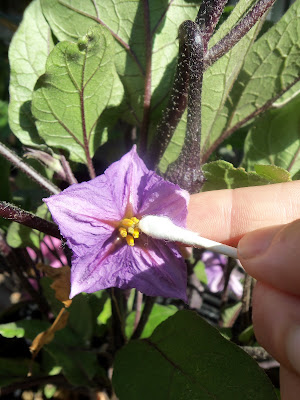
When the bees aren't around, you can do this yourself. With a q-tip (you can use a small brush or something like that) I rubbed the pollen from the stamen onto the pistil. If you need a refresher on your plant parts check out this diagram. Basically you want to rub the pollen from the long thick central yellow part to the stigma in the center. Watch out--many eggplant flowers have sharp thorns that will stab ya if you're not careful.


I repeated this process on all the flowers for two days in a row. The flower will eventually close, and look what happens in a few days! I have five baby eggplants. Yay! I feel like Medel himself, and am pretty proud of my botany back-yard experiment. Make sure you use a different q-tip on different eggplant varieties, otherwise you'll cross pollinate. 


You can hand-pollinate other vegetables, but this process is a little different for "non-perfect" flowers like cucumbers, squash, pumpkins, and watermelon. Look for female blossoms on your plant that have an ovary just below the petals. Usually you'll only have few of these, and tons of male flowers nearby. You can either remove the male blossom and rub the pollen onto the stigma or center of the female blossom, or you can use a q-tip/brush to do the same thing. Similar to eggplants, the blossoms will also close, and a few days later you'll have a baby squash, ready to eat in no time. 

Wednesday, July 18, 2012

Refrigerator Dilly Beans!

Well, hello. It's been awhile. I've been busy working, and a good friend from college came to visit me all the way from Vermont. We went camping on the Oregon coast, and although we were only gone for a night, something magical happened while we were away. My bean plants exploded beans!

I also got the first zucchini of the season. There are now three little baby squash on my yellow squash plant, and my half dead tomato plants are coming to life!

before
after
If you notice on the left, the plants have an almost purple hue to them. I think they had phosphorus deficiency. I've been watering them and fertilizing them with a fertilizer both high in nitrogen and phosphorus, and they are doing great!

I've been eating lots of beans for the past four days, and I'm kicking myself for not documenting some of the recipes. Most of them were delicious, so I'm sure I'll make them again.

For now though, here is a super easy and fast recipe for dilly beans. It makes two pint jars, which I think is a good amount for refrigerator pickles. Embarrassingly, and especially when it's hot, I can eat a whole jar myself in just a few days. I think dilly beans are my favorite, straight out of the jar pickle, and I'm pretty sure they will be yours if you give these guys a try.

purple beans: royal burgundy
Here are my beans before I blanched them. I felt compelled to share a pic in this state so you can see the purple beans! Unfortunately, the purple ones turn green after they've been cooked/blanched, but they're still kinda fun nonetheless.

DILLY BEANS
Makes 2 pint size jars

1 cup water
1 cup white wine vinegar
2 tbsp sugar
1 tsp salt (kosher is best so it doesn't get cloudy in your jar)
3 cloves of garlic, minced
pretty spanish roja garlic
Boil the above ingredients, and cool to room temperature. Then blanch 2 large handfuls of green beans, and place them in an ice bath

In each jar place:
1/2 tsp black peppercorns
1/2 tsp pickling spice
1 dried cayenne pepper (I still had some left from last season, but red pepper flakes work, too)
1/4 medium onion very thinly sliced
Several sprigs of dill 
Then fill your jars with the blanched beans.  Once the brine is cool, pour over the beans leaving 1/2 inch from the top, and place in the refrigerator. Your dilly beans will be ready to eat in two days, and likely gone two days after that. :)


Sunday, July 8, 2012

Summer Portland Garden Store Trip

What a beautiful Saturday! Just as promised, summer is finally here. Everyone says it always starts after the 4th of July. We all act surprised every June while rest of the country sits poolside and we've only begun to use our ceiling fans----but alas!

I spent the yesterday kicking off summer helping my dear friend plan her first vegetable garden. We visited two garden shops and she found some awesome bargains. Livingscape has super sales on tomato and pepper starts right now. They are selling for $1-1.50, and they have a large selection of pepper varieties that are still looking good.

I was also pretty proud of myself--I only bought one plant! Well, my friend bought me another pepper plant, and I picked up these two for free. They aren't looking so hot, but I'm taking reviving them as a challenge and will post updates on how they fair.
 

I transplanted them into a 5 gallon cloth pot with potting soil, compost, and some fertilizer high in nitrogen. Hopefully they will cheer up soon. These cloth pots are also a bit of an experiment. It's my first time using them, but the other tomato and cucumbers I have growing in them are lookin' good these days.

Perhaps the most exciting part of the day was the purchase of this little guy.


This is a Mexican Sour Gherkin that we picked up from City Farm, which is my favorite gardening store in the area. Their staff are super friendly and they always have varieties of plants I can't find elsewhere. Also today they have a Groupon! So check them out!!

Anyway, look at how cute these little tiny gherkins are! I can't get enough.


They are also pretty drought tolerant, (I think because of the fruit's small size) and are supposedly good in containers. The City Farm staff told us that they are sour and have an almost pickle like taste when eaten fresh.

Now comes the worst and the best part--the wait...


Wednesday, July 4, 2012

Fourth of July Grilled Pizza


Happy Fourth of July!

Most of you are probably making burgers, hot dogs, and corn on the cob today. Drew has to work, so we decided to celebrate a little early and made this on July 3rd: Grilled Pizza!
Grilled Swiss Chard Pizza w/garlic, red peppers, & feta
A friend of mine said she made grilled pizza the other night since it's sweltering hot on the east coast. Who wants to turn on an oven and make pizza when it's 100 degrees outside? While it's cool and comfortable here, her rave reviews convinced me I had to try it.

I used this dough recipe, and substituted half of the flour for whole wheat. I made two smaller pizzas so it would be easier to handle and flip on the grill. They were about 10 inches.

Swiss Chard, Garlic, & Red Pepper Grilled Pizza
makes 2 small pizzas
-8-10 medium to large stems of swiss chard
-4 cloves of garlic
-1 sweet bell pepper
-Sauce and cheese as you like
-Olive oil for coating the dough and grill
-Chopped fresh basil

Oregano & Cumin Salad Dressing
-1 tbsp fresh oregano
-1 tsp ground cumin
-1 clove chopped garlic
-3 tbsp olive oil
-1/4 c rice vinegar
-1 tbsp apple cider vinegar
(Keeps for a few days in the 'fridge.)

When the dough is almost done rising, start prepping. It's important to have everything ready as this pizza cooks fast. No time for multi-tasking. I went ahead and made this salad: baby swiss chard, green onions, radishes, yellow carrots, and the dressing above. Making things exclusively with veggies I've grown never gets old!

Rough chop and lightly sauté the full sized swiss with the sweet bell pepper and two large cloves of garlic. We love garlic! Especially the Spanish Roja variety we grew this year. But feel free to use any toppings you have at home. The swiss chard plants are going crazy right now and will probably go to seed soon, so we're eating lots of chard these days. Set your toppings aside and let cool. Be careful not to overcook the greens since they will cook some more once they're on the grill. 
pretty rainbow swiss chard
When the grill is warm, but not too hot, brush olive oil on the grates. You can use a paper towel or brush. 
Sully wants some pizza...
Set up the toppings, sauce, and cheese on a table near the grill. Put the dough on a cookie sheet and brush one side with olive oil. Quickly flip the pizza dough onto the grill. Time will vary depending on the temperature of your grill. Ours took about a minute! Flip the dough and then add the sauce, cheese, and toppings. Cover the grill, and let cook for 3 more minutes. Remove from heat, cut, and serve with fresh chopped basil. 

YUM! This was a beautiful summer dinner. While a little time consuming to prep, it was really fun to make together, and certainly cooked a lot faster than oven pizza.


Tuesday, July 3, 2012

Garden to Kettle: Brewing the Juneuary Wit

The coriander seeds are here, and just in time for Drew to brew a new beer.


We picked a couple tablespoons to use fresh, and will leave the rest to dry on the vine, and finish drying in paper bag.


I have trouble sticking to recipes. Instead of a wit, I think I just made a hoppy Belgian ale. I've had Citra hops on the brain, so I bought some at the homebrew store along with the other ingredients. Didn't even try to fight the impulse. Then, fifteen minutes before flame off, I remembered I had some Simcoe hops in the freezer. So, whatever this beer turns out to be, it's not a wit.

But I did stick to using orange peel and coriander from Jen's garden. That's a lie, actually. A real wit recipe would have used dried coriander. 

I used flaked oats and CaraVienne, and steeped them for 30 minutes at about 168 degrees.


I added the coriander and orange peel at the boil, as well as an ounce of Goldings.


Some folks say that you shouldn't let your dogs stay in the house during a brew. Thats fine, but I think a deep clean of your equipment and brewing space is sufficient. Also, this dog tried to attack the lawn mower and weed whacker Jen was using outside. He forced a compromise.


More updates on how this brew turned out soon! Feel free to comment for more details regarding home brewing and/or the recipe.